Food
Cookbook Review
Flexible Chef Nealy Fischer on the ‘Food You Want’ and Crave

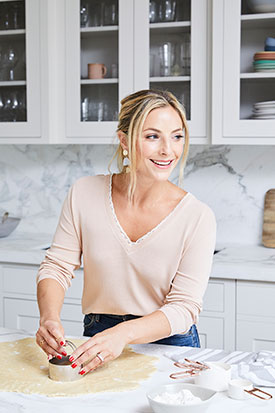
“Making dinner used to feel like a stressful chore,” confides Nealy Fischer, a luxury wellness and health purveyor and founder of lifestyle brand The Flexible Chef. “I followed strict rules and cooking guidelines. If a recipe called for an ingredient I didn’t have, or one that didn’t fit my dietary needs, then I feverishly began the hunt for a completely new meal. It was overwhelming and a real time suck.”
Knowing something had to give, the globe-trotting mother of four—she splits her between Montana, Hong Kong and Israel—devised a way to make dinner time much more doable for her on-the-go needs.
Planning meals and prepping ingredients in advance became paramount to getting through the week. Flexibility became friend instead of foe, and a well-stocked pantry and freezer—plus an open mind—meant that swapping out ingredients for what she had on-hand became a creative way to jazz up her favorite go-to recipes. In time, this new flexible approach became the foundational concept of her first kosher cookbook, Food You Want: For the Life You Crave.
Promising “100+ recipes you can transform into 1,000 different dishes,” Fischer’s book prescribes much needed balance in a world of extremes. Having ultimately found her own personal balance through practicing and teaching yoga, she encourages readers to become “unshackled chefs” and to create family dinners that fit one’s particular lifestyle, with regard to prep time, budget limitations and diet preferences or restrictions.
Healthy but not rigid about eating well—she believes in the occasional treat—Fischer is drawn to unlikely pairings that will stretch your appetite for ethnic foods, for example Vietnamese spring rolls dipped in tahini sauce (they taste great!). The book is filled with Fischer’s tips and tricks that are essential to successfully managing your kitchen and turning out delicious, easy and wholesome meals.
Often, Fischer’s swap-out ingredients are inspired by the three places she lives: “One of my favorite dishes from [the book] is Island-Style Chicken Adobo,” she tells me. “It calls for fresh lemongrass, which I can’t always find when I’m in Montana. So, during my time there, I get flexible by simply ditching the lemongrass and increasing the ginger and garlic to make the dish more fragrant.” Another example, from that same recipe, is replacing the bone-in chicken thighs for a different cut of chicken.
“Another great swap-out ingredient is zucchini,” she shares, full of excitement over what I assume is one of her favorite summertime vegetables. “In [the] book I use it to create a lightened-up version of lasagna. I also like to spiralize zucchini and make a healthier pad thai.”
After reading the book, I became especially intrigued by the Ice Cube Infusions, which are mostly frozen cubes of fruit, wine, herbs and sauces that make it easy to have a variety of ingredients prepped and at your fingertips at all times. And her Fruity Coconut Breakfast Popsicles—packed with layers of creamy coconut milk, chia seeds, fruit purée and natural sweeteners—are “totally Instagram-worthy,” according to Fischer, as well as an ingenious solution to busy weekday morning routines. Other standouts are her Layered Haloumi Breakfast Salad; Best Ever Gluten-Free Challah; Minted Pea Soup with Roasted Beetroot; and Miracle Chicken and Vegetable Stir-Fry, which is actually baked, sauce and all, in the oven, freeing you from standing over a hot wok.
Included below are some trademark Fischer-flexible recipes: a burger that draws its moisture from sautéed vegetables; baked cornflake-crumb chicken schnitzel that’s been marinated in honey mustard sauce; and a high-protein cheesecake that she swears your guests won’t know is dairy free. I’ll eat to that!
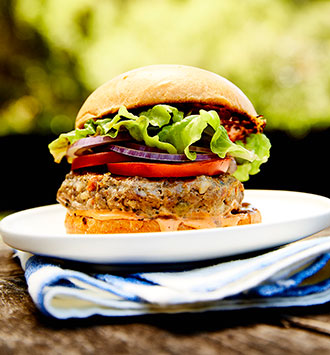
 Sneakily Good-for-You Beef Burgers
Makes 8 burgers
After transitioning from vegetarian to once-in-a-while carnivore, I realized I had to work a little harder to ensure sufficient veggie intake. Enter these sneaky beef burgers. The flavor boost from the veggies enhances the beef more than just nutritionally—they make the patties irresistibly tasty and moist. Dare I say these are the best burgers ever?
1 tablespoon olive oil
1 cup finely chopped mixed vegetables (e.g., combo of garlic, mushrooms, carrot, zucchini)
2 pounds lean or grass-fed ground beef
1/2 medium yellow onion, grated or finely diced (use the food processor if you wish)
2 large eggs
2 teaspoons tamari or soy sauce
1 teaspoon sriracha sauce
1 teaspoon Dijon mustard
1/2 teaspoon salt
1/4 teaspoon freshly ground black pepper
Oil spray, for pan or grill
- Preheat an outdoor grill or indoor broiler.
- Caramelize the vegetables: Heat the olive oil in a large skillet over medium heat. Add the chopped veggies, starting with the firmer ones first and adding the softer ones 5 or 6 minutes later. Cook, stirring frequently, until they are a rich brown in color and soft in texture, 10 to 15 minutes total. Allow to cool slightly.
- In a large bowl mix the beef, vegetables, onion, eggs, tamari, sriracha, mustard, salt, and pepper.
- Divide the mixture into 8 round patties, and flatten them just slightly.
- Arrange the burgers on the grill grate or in a greased broiler pan, and cook until lightly browned on the first side, 7 to 9 minutes. Flip the patties and cook for 4 to 6 minutes more, or until cooked to medium (with a light pink center).
- Serve, if desired, on buns or lettuce leaves, with sriracha mayo, red onion, tomatoes and, yup, ketchup, if you like.
nail this:
- If you make your burgers in the oven they will release a ton of yummy juice. Don’t you dare dump that liquid gold. Drizzle it atop your burgers before serving, or reserve (even freeze) it for later, and stir it into rice or veggies.
- The key to the moistness of these burgers is the sautéed vegetables. Don’t be tempted to eliminate them!
flip it:
- Bake your veggies at 350° instead of sautéing them: Toss them with olive oil and salt, spread them on a baking sheet, and slide them into a preheated oven until they’re cooked and lightly brown, 15 to 20 minutes. Pop them in the food processor, or finely chop before adding.
- Leftovers? Chop up a burger for your lunch salad.
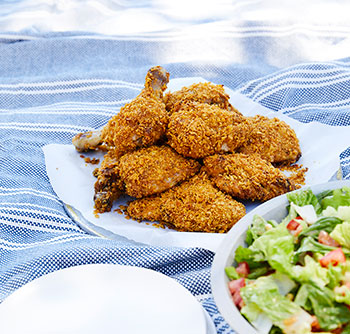
 Unfried Chicken Schnitzel
Serves 4 to 6
The kicker to this recipe is to marinate the chicken overnight in a honey mustard dressing. Instead of discarding the marinade, you savor it like gold and keep every last drop in the bottom of the pan while the chicken cooks. The crumbs melt into the mustard sauce, making this dish sing. Complexity can be overrated—many of the best simple recipes, like this one, are the most requested.
1 whole 4 1/2-pound chicken, cut into 8 pieces
Tangy Mustard Vinaigrette Dressing
3 cups cornflake crumbs (store-bought or crushed cereal)
Pinch of salt and freshly ground black pepper
- Marinate the chicken in your favorite mustard vinaigrette directly in the baking dish, refrigerated, overnight or up to 24 hours. Alternatively, to save space in the fridge, marinate it in a Ziploc bag—but don’t discard the marinade, you’ll pour it into the pan with the chicken before roasting.
- Preheat the oven to 400°.
- Season the cornflake crumbs with salt and pepper.
- Place about 1 cup of the crumbs in a shallow bowl or plate. Coat the chicken pieces in the crumbs, then return them to the pan with the marinade. Replenish the crumbs as needed. Make sure each chicken piece is well covered.
- Bake the chicken for 40 to 50 minutes. Start checking at the 35-minute mark: Prick the chicken to see if the juices run clear and it’s cooked through.
- This dish can be made a day in advance and reheated, uncovered, just before serving. If making in advance, underbake the chicken by a few minutes so that it remains moist after reheating the next day.
nail this:
- Don’t skimp on the flavor infusion achieved by marinating the chicken overnight.
- You can either buy a box of Kellogg’s cornflake crumbs or (what I usually do because I often can’t find ready-made crumbs) crush a box of cornflakes in a food processor or by hand—just put them in a Ziploc bag and crush away. A rolling pin is a good tool for this task. This is a great way to involve your kids in meal prep. Don’t forget to season the crumbs to taste.
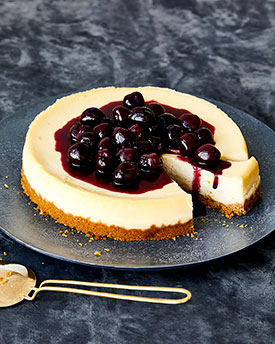
 Unbelievably Dairy-Free Cheesecake
Serves 10 to 12
My diners are usually stunned that this cheesecake is dairy free—it’s really that good. In truth, it’s more decadent than I like to admit, and we serve it only occasionally (to my kids’ dismay). I’m breaking my own flexible rules by sharing it with you because this cake contains one ingredient that’s necessary without exception: nondairy “cream cheese.” It is available in many supermarkets, but locating it can sometimes be a challenge. Still, some things are worth searching for.
CRUST
2 cups (8 ounces) graham cracker crumbs (I use gluten free—or use any cinnamon cookie, crushed into crumbs)
8 tablespoons coconut oil, melted
1 tablespoon granulated sugar
FILLING
3, 8-ounce packages plain dairy-free “cream cheese,” preferably Tofutti brand
1 cup granulated sugar
1 tablespoon fresh lemon juice
2 teaspoons vanilla extract
1 teaspoon minced lemon zest
3 large eggs
1 cup well-chilled coconut cream solids (drain before measuring)
3 tablespoons all-purpose gluten-free flour
Pinch of salt
Pineapple or cherry compote or seedless raspberry jam, for topping (optional)
- Preheat the oven to 225°. Line the bottom of the springform pan with parchment paper, and spray the sides with cooking spray (or the cake will stick).
- Make the crust: In a medium bowl, mix together the crumbs, coconut oil, and sugar. Press the mixture into the bottom of the prepared pan; place it in the freezer while you prepare the filling.
- Make the filling: In the bowl of an electric mixer, combine the cream cheese, sugar, lemon juice, vanilla, and lemon zest. Cream the ingredients together, scraping down the sides and bottom of the bowl and beaters. Continue mixing until well blended.
- Add the eggs one at a time, beating well after each addition. Add the chilled coconut cream, and beat for one full minute.
- Stir in the flour and salt, mixing until just incorporated.
- Remove the pan from the freezer, and pour the filling over the crust. Bake for approximately 2 hours, or until the sides are set and the center still jiggles a little bit but springs back when touched.
- Turn off the oven and open the door. The cake will continue baking as the oven cools down and should dry to a smooth finish on top, with no cracks. Refrigerate, covered, overnight.
- Run a knife around the edge of the cake, then remove the springform. Top the cake with pineapple or cherry compote, if desired. If using jam, make a glaze by warming it in the microwave for 30 seconds, then cooling it to room temperature (so that it’s runny and spreadable).
nail this:
- Discard any clear water from the can of coconut cream, and use only the white, creamy solids.
- You need to chill this overnight so it will set. Plan on making it a day ahead of serving. It can be made up to 2 days in advance.
- Notice the low oven temperature? This helps the cake bake evenly, avoiding burnt edges or cracks on top.


 Facebook
 Instagram
 Twitter
Leave a Reply